My Presets Are Gray When Uploading to Lightroom Classic Cc
Finding the Universe contains affiliate links, meaning if you lot brand a purchase through these links, we may earn a committee at no extra toll to you.
I've been using the desktop version of Lightroom for many years as the middle of my photography editing workflow. I honey the way information technology handles pretty much everything I need in terms of managing my photos and editing them, and I use it for 95% of all my photography mail-processing.
As a travel photographer, I discover Lightroom to be the best photo editing software, and an indispensable tool. The monthly subscription is a price well worth paying, and I recommend it to all my students on my travel photography course.
1 matter I don't love well-nigh Lightroom though is how tiresome and painful it sometimes tin be to utilize, which seems to take gotten worse over the years. Every release seems to exacerbate the issues, especially on larger monitors, despite having a fast desktop auto with all the bells and whistle.
Considering of this, I've become slightly obsessed with optimizing Lightroom so information technology runs every bit well as is possible.
In 2017, Adobe released a major update to its photography toolkit, and in particular, it re-branded the desktop version of Lightroom into Lightroom Archetype CC.
One of the major, and most heady announcements with this release was that Adobe had finally done something virtually Lightroom'southward performance issues, and this release would harken me back to the days of yore, when Lightroom was nimble and responsive.
Subsequent updates have continued to better performance, including a major update in mid-2019 and another in late 2020. However, whilst these updates have certainly helped, at that place are still a few ways to brand Lightroom faster.
Based on my background as a software developer and as a regular user of Lightroom, I've put a lot of piece of work into figuring out the means to make Lightroom equally fast as possible. Read on to find out my peak tips for improving Lightroom performance! Commencement though, let'south answer a question about performance.
Table of Contents
Why is Lightroom Classic Tiresome?
There are a number of reasons Lightroom Archetype might be running slowly. Later on all, Lightroom is a circuitous application that performs the dual functions of photography direction and photography editing.
These two functions both crave a powerful reckoner, and they require the movement of a lot of information to and from your computer's hard drive, memory and processor.
To allow you to manage your photograph library, Lightroom builds a large database of your images. This allows you to practise all sorts of wonderful things from a workflow perspective, like finding images shot with a specific lens, or at a specific shutter speed. Plus in that location are all the tools like keyword direction, labelling and so on. The flip side of this is that a more complicated database take more power to run.
From a photo editing perspective, Lightroom is what is known as a non-subversive editor. Every edit you make can be rolled back, and the original image file remains on disk. Unfortunately, this also means that every edit y'all make has to exist applied and calculated against all the previous edits. So as you lot make more and more than edits to an image, the slower this process becomes.
The good news is that you lot can ameliorate performance of Lightroom Classic CC by following a number of Lightroom performance tips. Whilst there will ever be limitations of what your computer can achieve based on the underlying hardware, these tips should help you get the well-nigh out of Lightroom on your computer.
What Hardware Does Lightroom Demand?
Adobe lists the recommended requirements for Lightroom every bit follows:
- An Intel or AMD processor which is 2GHz or faster, or an Apple Silicon processor
- 16GB of RAM
- A 1920 x 1080 display
- A GPU with 4GB of VRAM for college resolution displays
In my feel, the more resources your computer has, the more Lightroom will use. For example, on my Dell laptop which has 16GB of RAM, Lightroom will happily suck up 8 – 10 GB of that, basically maxing out my RAM usage.
On my desktop, which has 64GB of RAM, Lightroom is more than than happy to have up more, often sitting at betwixt 20 and 25GB of usage.
If I'm editing large photos such as panoramas, and moving images betwixt tools similar Lightroom, Photoshop and Topaz DeNoise, and so my desktop will often exist running at twoscore – 50GB of RAM usage.
At this point I'd say 16GB is usable, and up to 64GB of RAM for Lightroom is beneficial, but more than that probable isn't necessary unless you have very specific images you are editing that are very large.
How To Speed Up Lightroom Classic CC
Here are my tiptop tips for improving Lightroom Classic performance, to aid you speed up your photography workflow. If you observe that your copy of Lightroom is running slowly, trying out these tips should help you speed it up!
1. Put your Itemize File on an SSD
If you have a reckoner with different difficult drives inside, and some of those are the older spinning mechanical way hard drives, and some are the newer, faster style SSD hard drives, so you will want to put your catalog file onto the SSD hard drives.
The fast speeds of an SSD ways that Lightroom tin go prototype information much faster. In addition, Lightroom stores all its preview files in the same identify every bit the Lightroom Catalog, and the preview file is what Lightroom renders. So you want that to be somewhere that Lightroom tin access it as rapidly as possible.
Personally, I take an SSD just for my Lightroom Itemize. This isn't a must, but equally I take a large itemize and I like to generate a lot of previews, information technology takes up a lot of space. So a dedicated SSD makes that easier to manage. I then have an SSD for my WIndows and program install files, and the rest of my hard drives are larger and slower mechanical hard drives.
Storing photos on a mechanical hard drive is perfectly fine, because you lot'll mostly be working from the previews that Lightroom is pulling off the SSD.
If you need to figure out the kind of difficult drive in your estimator, here are instructions for Windows and Mac. Moving your catalog file is merely a question of locating its electric current location and then moving it in either Windows Explore or Finder. Full instructions on this folio.
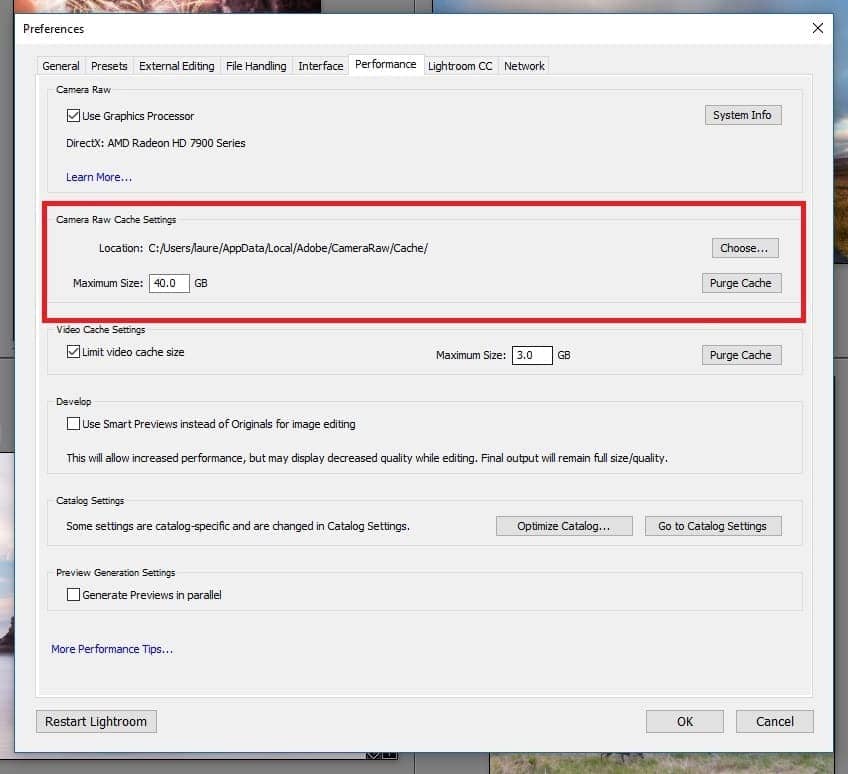
two. Brand your Camera RAW cache bigger
Lightroom has 2 places where it caches image data. One is the preview cache as mentioned above, which is stored with your itemize file and used for the library view, and the other is the Camera RAW cache.
When you switch to the Develop view, Lightroom loads the prototype information into its "Camera RAW cache". This defaults to a size of 1GB, which is sorry, and means that Lightroom is often having to swap images in and out of its enshroud when developing, resulting in a slower Lightroom experience.
I'd suggest setting this to a number more like 20GB. I'd also recommend putting the camera RAW enshroud on an SSD drive so as to get maximum performance out of information technology. I've personally found that Lightroom appears to run faster when this RAW cache is on a separate drive to my system files, but I have no hard evidence to back this merits up. Still, worth a try.
You lot can set your Photographic camera RAW size and location from the Edit->Preferences menu, and then choosing the "Performance" tab.
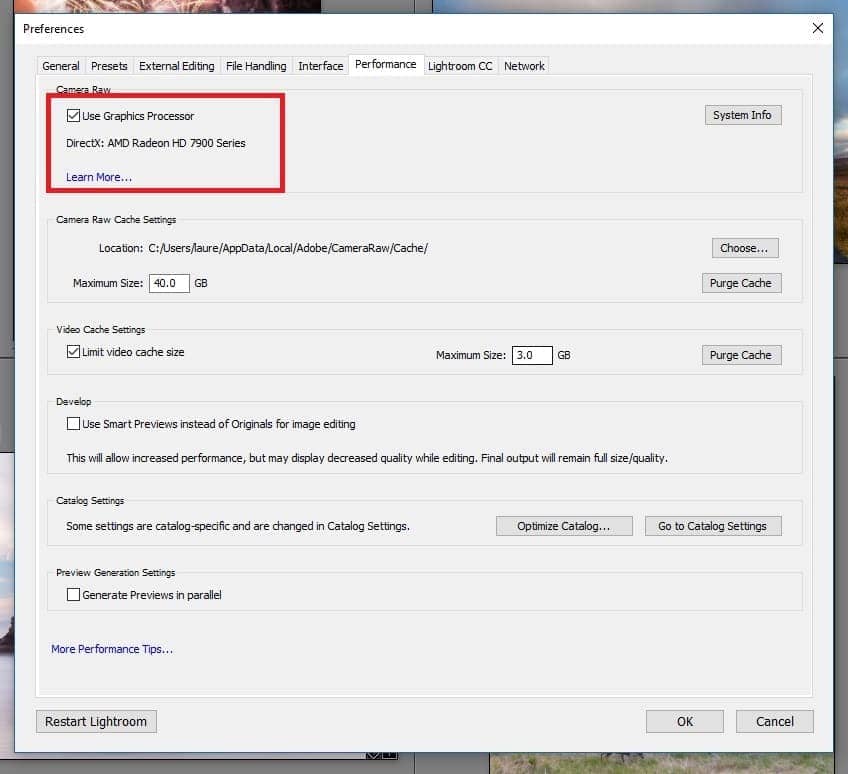
3. Toggle using your Arrangement Graphics Carte du jour
A few releases ago, Adobe announced that they had optimised Lightroom to have advantage of the graphics processing bit (GPU) inside a computer. These capabilities were improved upon in the Baronial 2019 Lightroom update.
A graphics chip is a function of your computer that is responsible for handling video related functions, and the theory is that these dedicated chips are faster at specific image rendering logic.
Whilst this all sounds good in theory, the reality is that the practice is not quite so simple. First, Lightroom simply uses the graphics fleck for some specific tasks, so not everything is accelerated. You can see what it tin use it for here.
Second, the performance benefits are only usually credible in specific situations. At that place is an overhead associated with using the graphics fleck, as data has to be offloaded from the CPU to the graphics chip, processed, and and then sent back once more.
Dissimilar reckoner configurations, operating systems, and different graphics cards hateful that sometimes there'due south a noticeable performance improvement from enabling the GPU, and sometimes it either does null, or even reduces performance.
In my experience, larger, higher resolution monitors tend to benefit the most from using the graphics chip, although with the trade-off that there will exist a slight filibuster in the image actualization on screen as the data shuffles betwixt the CPU and the graphics bit. Lower resolution monitors see less benefit, and may even be slower with the graphics scrap enabled.
To exist honest, at that place is no correct answer to whether or not you should use the graphics chip.
Personally, with a large loftier resolution monitor and fast graphics chip, I discover the operation enhancements in both the library and the develop module are noticeable with my graphics processor enabled, and I don't mind the merchandise-off that images take a fraction longer to load as I switch between them.
For users with smaller screens and less capable graphics chips, such as those often found in laptops, you might find that Lightroom performs noticeably worse with graphics acceleration enabled.
Adobe has more detailed information hither on supported graphics chips and how to identify your graphics processor. My advice is to try the diverse settings, and run across which works faster for you lot.
The easiest thing examination to see if there is a divergence with the GPU on and off are how fast the global adjustment sliders impact the paradigm and how fast you can switch betwixt images.
Just try it out, and come across what works best for your setup.
The image below shows how to toggle the GPU in the pre-Baronial 2019 version of Lightroom Classic.
As of the August 2019 update of Lightroom Classic, Adobe has further improved GPU usage in Lightroom, and the menu for toggling the GPU has inverse slightly.
Instead of a unproblematic on-off checkbox, you now have a drop downwardly with iii options, "Machine", "Custom", and "Off".
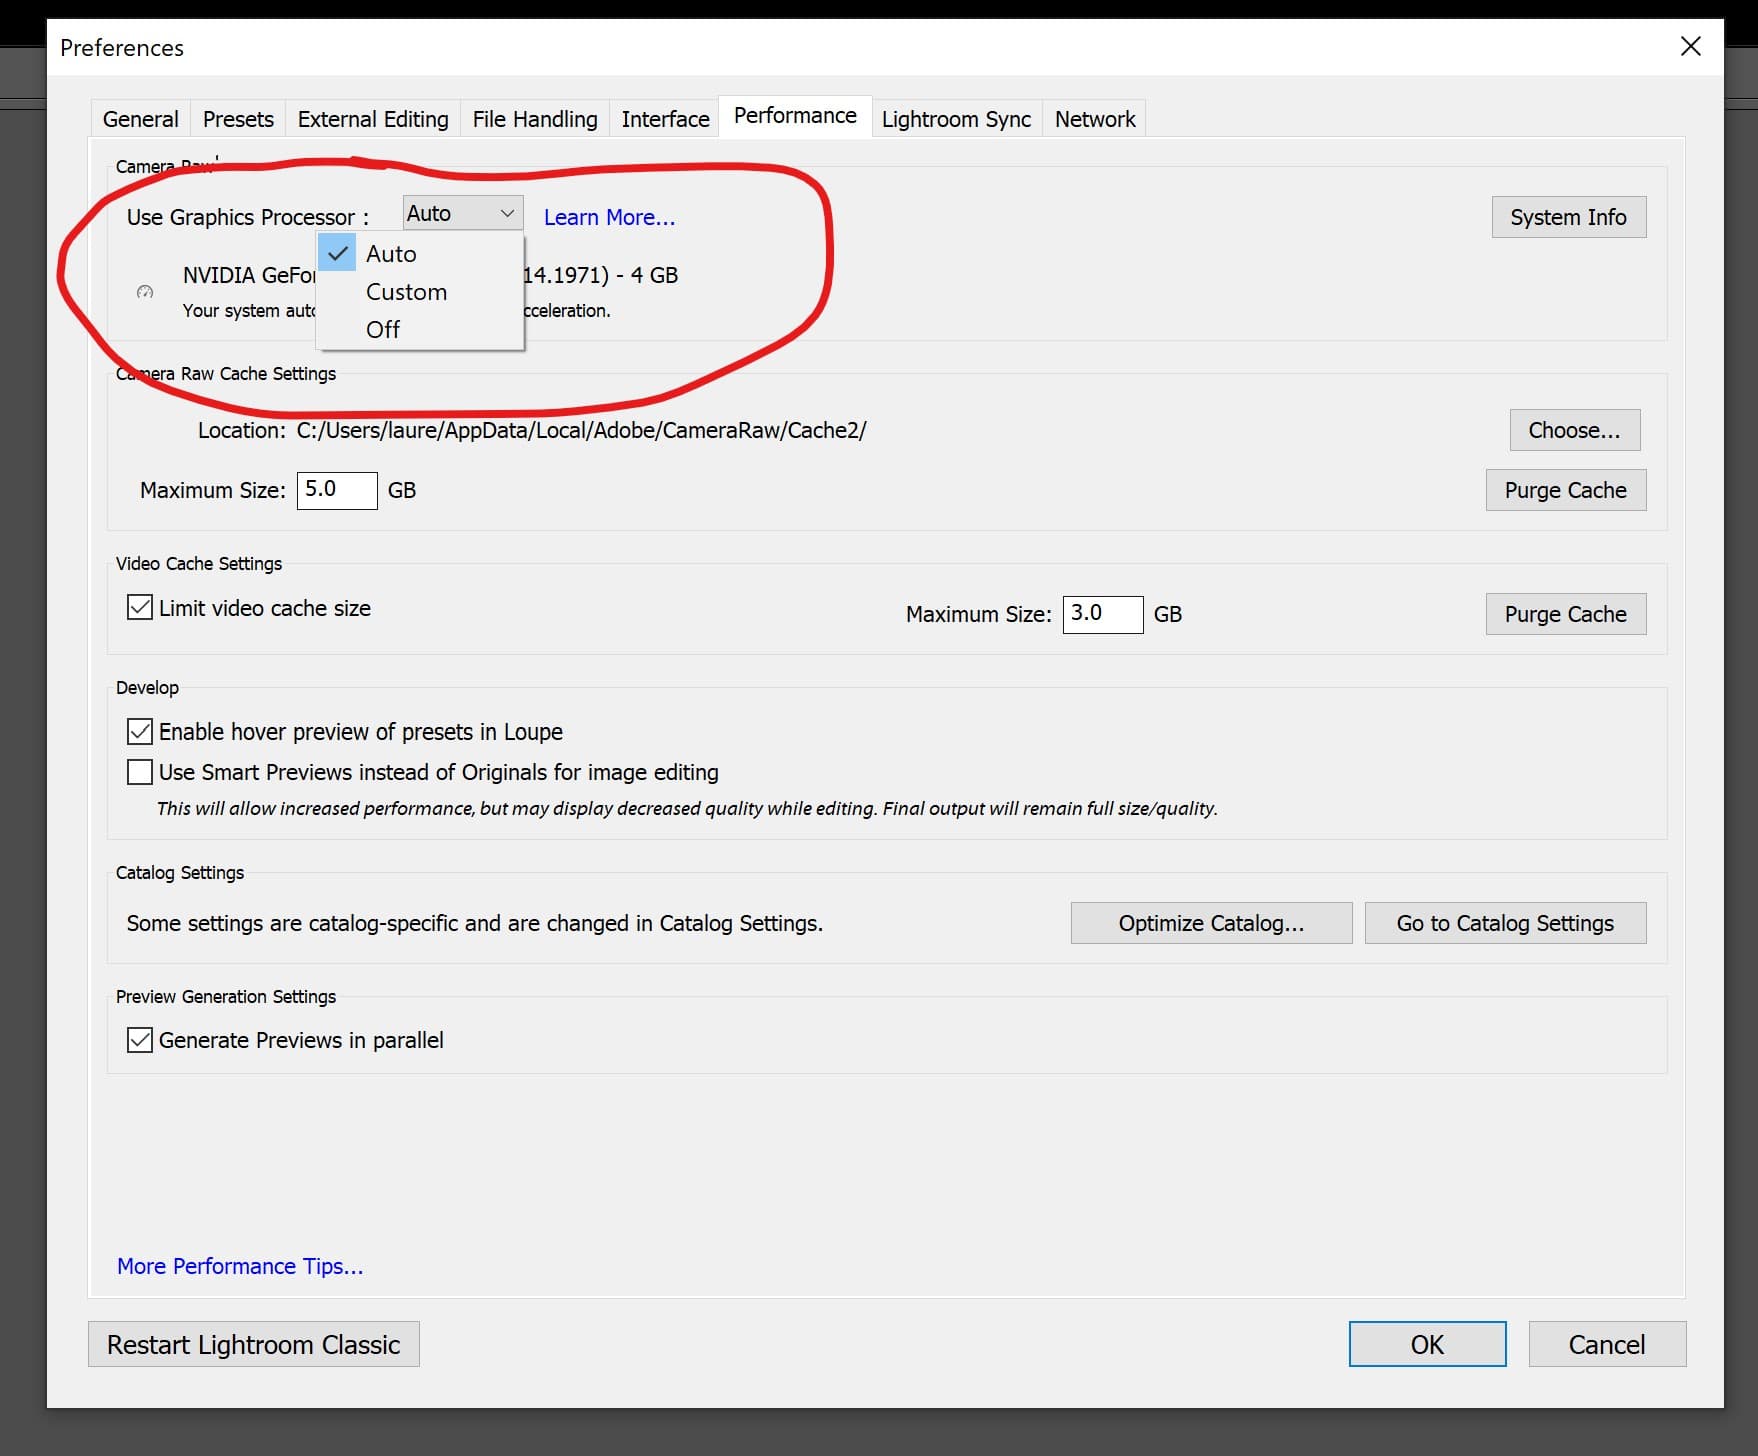
The default setting is Machine, where Lightroom detects the capabilities of your graphics card, and so decides what to accelerate. In theory it should make up one's mind between bones acceleration and full acceleration.
In my experience on all my computers so far however, Lightroom in the Auto mode has just enabled basic acceleration, despite my computers having powerful graphics cards.
The good news is that you can use the "Custom" setting in the drib down. When you select this, you then get the selection to enable the GPU for epitome processing likewise.
If yous enable this, Lightroom will use the GPU for a range of prototype editing tasks. I would highly recommend trying out the custom style and enabling the "Use GPU for image processing" checkbox.
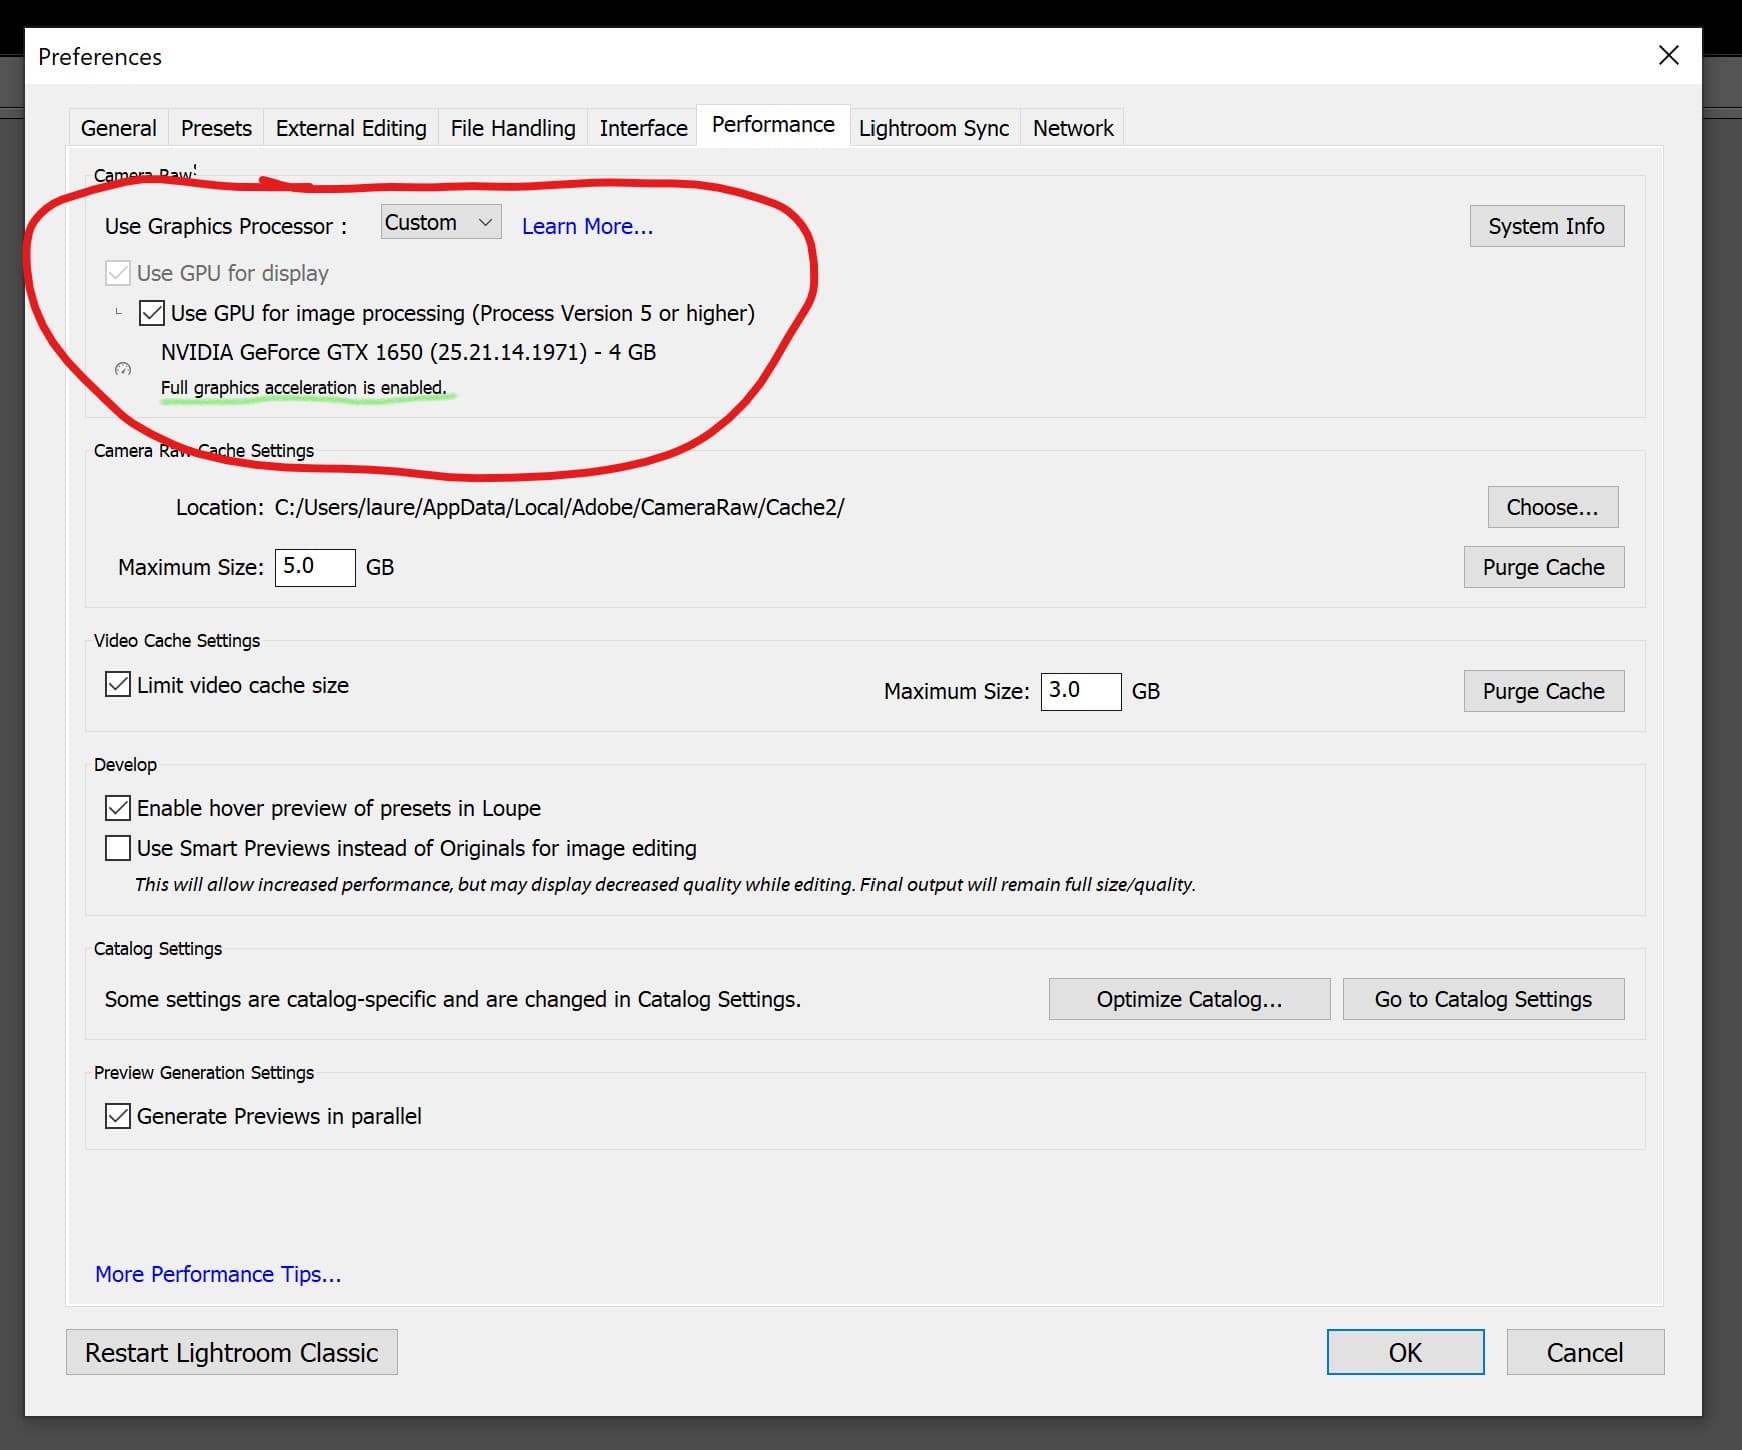
When you enable this, you should encounter the text "Full graphics dispatch is enabled", as underlined in green in the epitome above. Again, try information technology out in the Develop module and move the sliders upwards and downward quickly to see what divergence having the GPU enabled or disabled makes.
It's also worth mentioning that in that location is a note by the "utilise GPU for image processing" checkbox that this only works for images using Process Version 5 or higher.
Process Version five was released in the October 2018 edition of Lightroom Classic. So if you have photos from prior to that time, they volition likely still be at an older process version as they do non automatically update.
Yous will desire to migrate your images to Process Version 5 in club to have full advantage of the GPU across your whole epitome library.
To update to Process Version 5, starting time backup your catalog. And then, go to your library view, and the "all photographs" selection in your itemize. From the filigree, select all the photos (Ctrl+A). One time they are all selected, right click, choose develop settings, and choose "Update to Electric current Procedure Version".
Notation that changing procedure version can bear upon how your images look, so you might want to test it out on a few images individually before batch applying information technology to all your images. This is as well why a catalog backup is essential, and then y'all can gyre the change back.
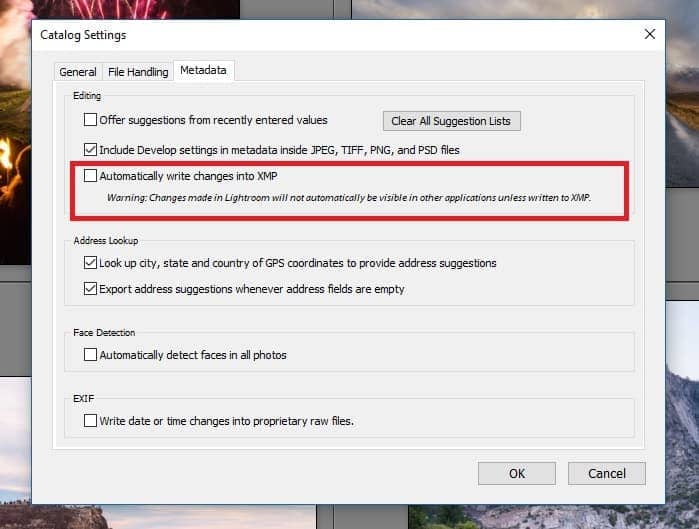
4. Pause XMP writing when Editing
Every bit you make edits to your photos in the Lightroom Develop module, Lightroom keeps track of them in the Lightroom catalog, which is essentially a database that has information on all your images.
This information is only available to Lightroom, so if you lot lose your catalog file, or want to edit your images in another application, y'all'll essentially have to start over from scratch.
Lightroom has a feature to help yous go around this. It can be configured to write all the develop settings data into a minor file called an "XMP" file, which basically merely contains the edit data. This file is written to your calculator hard drive in the same identify equally your original RAW file. And so for example, if your RAW file is called IMG_8032.CR2, a new file called IMG_8032.xmp volition announced next to it. This is just a text file containing edit information.
Whilst this sounds dandy in principle, the event is that writing changes into this file can dull Lightroom downwards, specially every bit the files are usually existence written to the difficult drive that your photo is on, which will in most cases be a slower, mechanical drive.
The solution is to disable "automatically write changes into XMP" from your itemize settings, and instead, if y'all wish to save XMP files, to practise it manually from the "Metadata" card, where you have the option to disable "salve metadata to files".
Update – as of Lightroom 11, released in October 2021, Lightroom has added a drop-down option in the elevation left card nether your name, where you tin choose to intermission XMP writing.
As such, I'd now recommend enabling "Automatically write changes into XMP" in your catalog setting, only then pausing information technology equally required, such as when you are in an edit session.
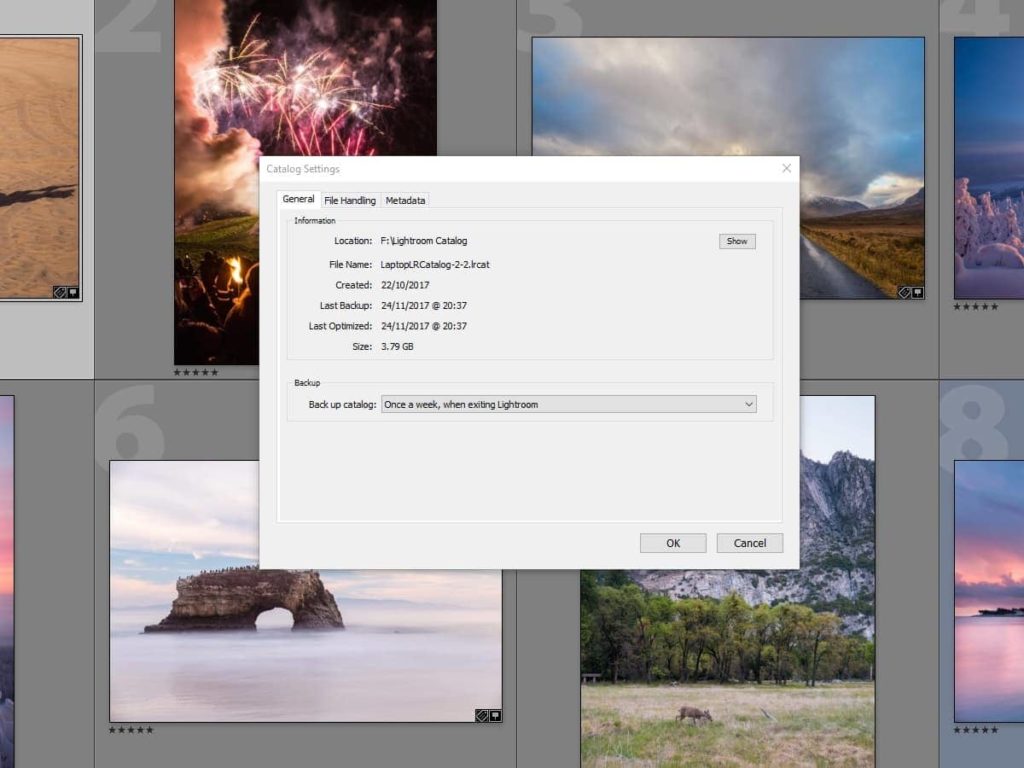
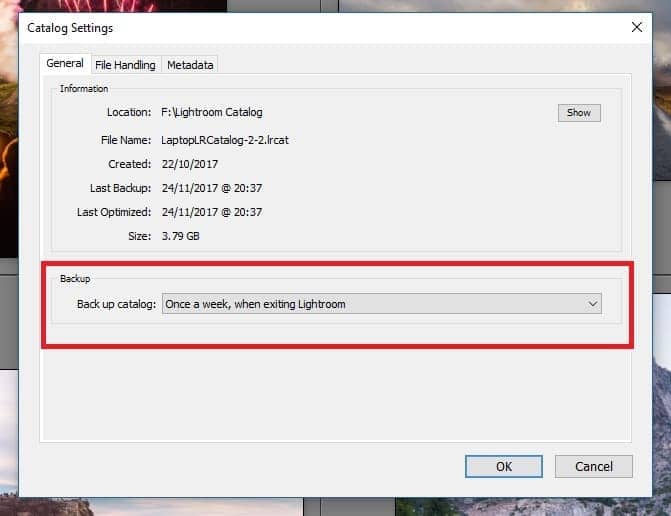
Also, backup your Lightroom itemize regularly, and go on a copy of the backup somewhere safe! Information technology won't make Lightroom faster, just it will relieve you a lot of heartache if your catalog ever become corrupt. You can set up your backup settings in the Lightroom Catalog settings in the "full general" tab.
five. Pause address and face up lookup
Lightroom has some fun/useful features, such as beingness able to search for faces in photos and match them to people, as well every bit looking upwards image addresses based on the GPS data your images may have.
Unfortunately, these tasks default to run in the background, and they can slow you downward whilst you're editing. So the best option is to break them whilst you're actively using Lightroom, and if you lot want to take advantage of them, just start them up once more when you're done editing.
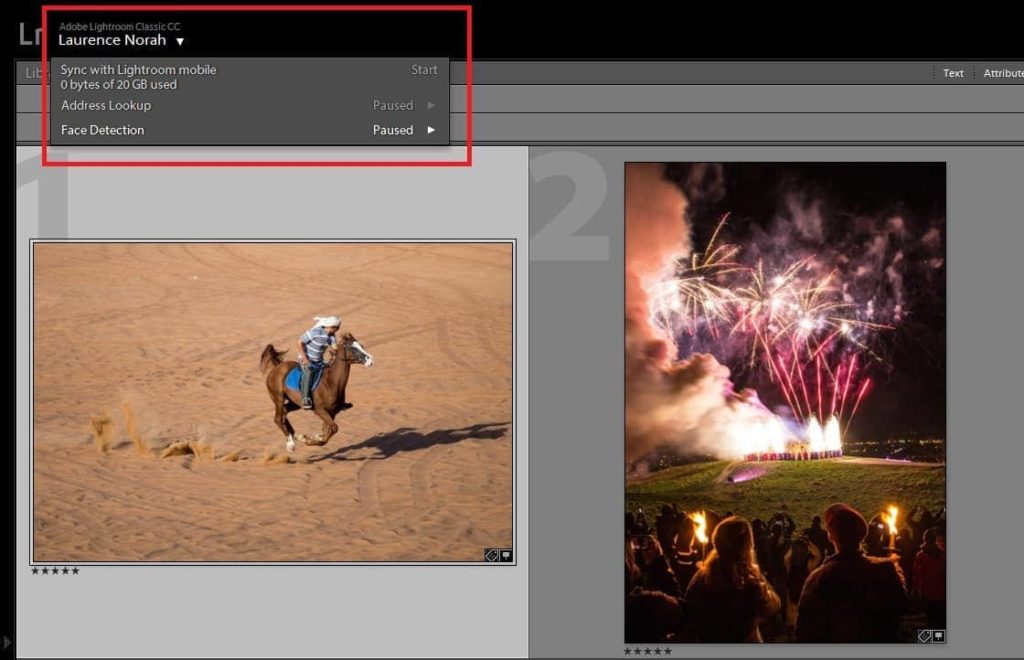
To intermission them, you'll demand to click on your name in the top left corner of lightroom, and a drop downwards bill of fare will appear showing you currently active tasks. Just hitting the suspension push button on those you want to intermission.
vi. Pause Image Syncing
Lightroom comes with the selection to synchronise your images to the web, and so you tin can access them from other devices and through your web browser, also as share work with clients.
This is great, but the synchronisation procedure is a fleck ambitious. In item, when you are editing a photo, Lightroom will try to synchronise the edits you brand to the photo as information technology goes. This volition frequently include generating a thumbnail of the image and uploading that to the web.
Doing this every time you move a slider in the develop module is clearly suboptimal! Thankfully, you can pause the sync process, just printing your name in the pinnacle left corner of the screen, and press the play/pause button next to the sync process.
I would recommend always pausing synchronisation when working in Lightroom, and re-enabling information technology when you are washed really editing photos and then it tin can sync your changes in the background.
vii. Build Standard Size Previews on Import
When you import your photos into Lightroom, you have a number of preview settings you can choose. Lightroom Classic CC has a new feature, where yous can build "embedded & sidecar previews".
My suggestion is to build standard previews on import. This will slow down the import process, only it volition make the Library module far more responsive when you come to review your imported images as Lightroom will be rendering the previews from your SSD rather than edifice them from the RAW files.
I don't use the new "embedded & sidecar previews". These are the preview files that are embedded in the RAW file, merely in my experience, these wait quite different to the previews that Lightroom develops, merely because the RAW processor in Lightroom renders images differently to my photographic camera RAW previews. I desire to encounter the images the way Lightroom does, and so I build standard previews.
Still, you might find that Lightroom works faster for you if you lot utilise the embedded & sidecar previews, so do experiment and see what works for your setup.
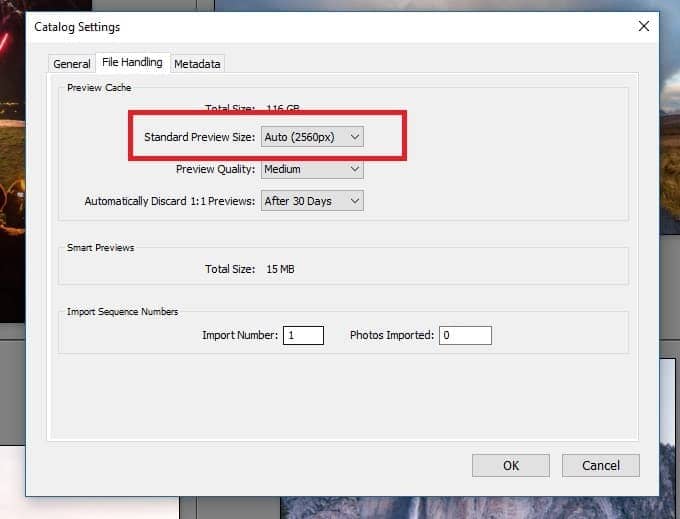
If you lot choose to use the standard previews, it's of import to ready the size of your standard previews correctly for your setup.
The size of your standard preview should be as close to your screen width every bit possible, simply not smaller. So if you have a 1920×1080 monitor for example,. that's 1920 pixels broad. Pick a standard size preview size of 2048 pixels. You lot can set the Lightroom preview size in the file handling department of the Itemize settings dialog box.
8. Build 1:i Previews Before You Edit
Lightroom also has the option to create ane:1 previews, which are basically the total size version of an image. You can choose to generate these previews on import, but this slows the import procedure downward, and uses up a lot of deejay space.
My suggestion is to add an extra step into your workflow. Once you have called the images y'all are going to piece of work with (normally possible with the standard size previews), select them, and and then from the menu cull to build 1:1 previews.
This volition have a few moments, depending on the number of photos, but volition speed up your development procedure equally Lightroom won't have to create 1:one versions of your images on the wing every bit you develop them.
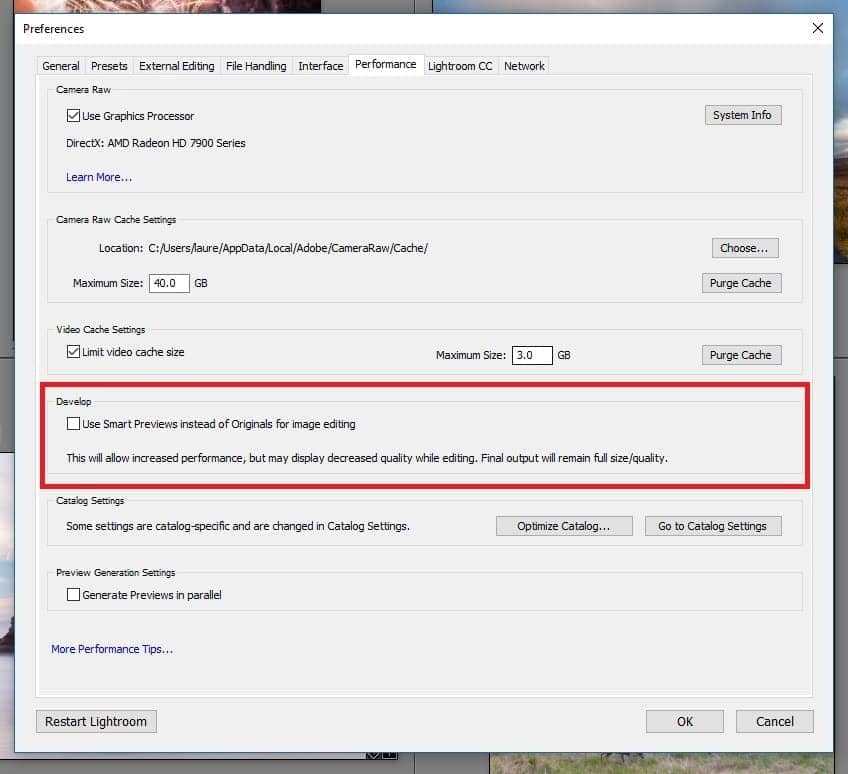
nine. Smart Previews – To Utilise or Not to Employ?
Smart previews are a tool that Adobe introduced to assistance photographers manage big image libraries even when travelling. The theory was that rather than bring your whole image catalogue with you, you could generate "smart previews" of your images, and take those with you. Smart previews are significantly smaller than the original RAW files, and you can edit them in the Develop module without needing the original file. When you render home, the edits are then linked with the original RAW file.
Adobe realised that this could be used as a operation workaround, because editing these small files was much quicker than loading upwardly the full RAW file in the Develop module. So in a bit of a hack, Adobe let people choose to edit the smart previews instead of the originals as a functioning option.
These are definitely faster for quick edits in the Develop module, although as you are working with a lower resolution file, equally shortly as you zoom to 1:1, you terminate up dorsum on the original file. In addition, since Lightroom Classic CC'southward performance improvements, tests have shown that in the Library module, using smart previews can actually reduce the operation of tasks like scrolling through images.
So at present you lot have a decision to make. Personally, I find that using smart previews in the Develop module was never hugely constructive, because as soon equally I zoom to a 1:1 size, Lightroom had to render the image anyhow, as the smart preview wasn't full size. Plus, those smart previews can take up a fair amount of infinite on my SSD.
So unless you lot see a pregnant operation increase in the Develop module from using smart previews, or you're not oftentimes editing at a 1:1 zoom, my proposition is to disable them for developing. You can set your smart previews develop preferences from the Edit->Preferences menu, and so choosing the "Performance" tab.
10. Edit Images Sequentially
Since Lightroom CC 2015.6 (& Lightroom 6.vi), Lightroom has implemented a feature to intelligently cache images for faster performance when yous are in the Develop module.
What this means is that when y'all are in the Develop module, Lightroom will automatically load the side by side and previous images in the filmstrip beneath your photos into memory. In the below image you lot can run across my filmstrip beneath the actively edited epitome. The actively edited paradigm is highlighted with a lighter grey background, and the images on either side of it volition have been loaded into retentiveness for faster access.
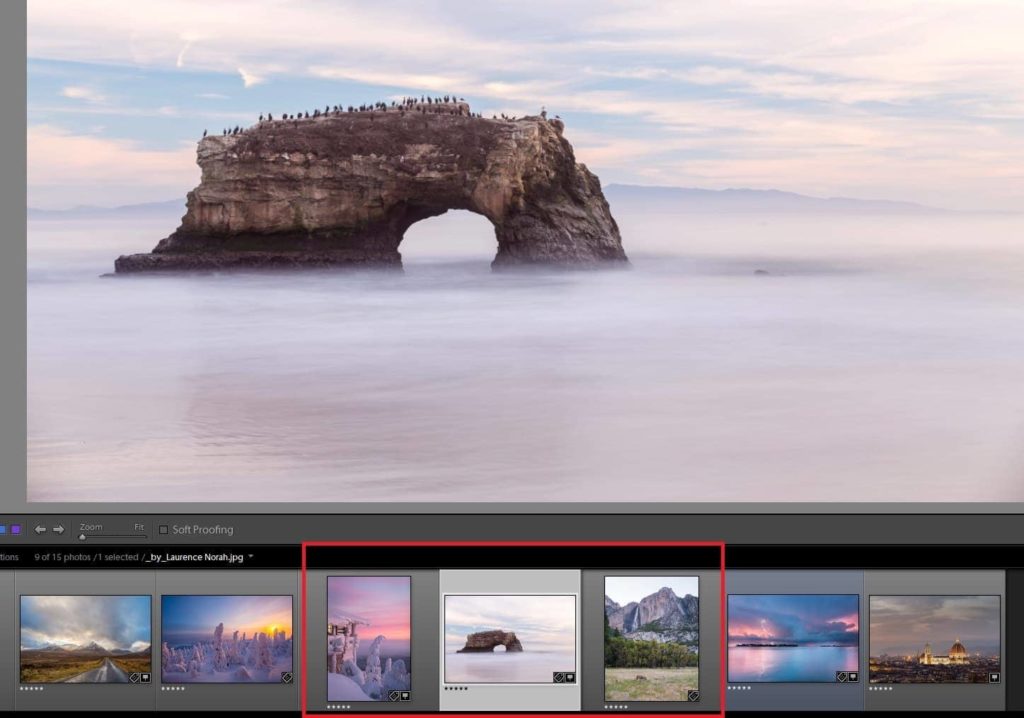
The tip here therefore is to adjust your workflow to be sure that y'all are editing images sequentially, rather than hopping around all over the place. What I exercise is use the library to filter the images I am going to work on using the various tools (flags, star ratings etc), and I only load them into the Develop module when I accept a series of images that all require editing.
I then work through them sequentially one past one, which means the image data is loading from organization retention, resulting in much more than responsive Develop module performance.
11. Utilize Develop Edits in an Optimal Order
When using the Develop module, the guild in which you lot utilise image corrections tin can have a significant impact on the performance of the Develop module. Every fourth dimension y'all make a new edit, it has to apply it and summate all the previous adjustments y'all brand. This is why the deeper you go into editing an prototype in Lightroom and the more than effects you utilize, the slower the Develop module tin seem to go.
Some filters can really dull downward the Develop module from the off. Filters like racket reduction for example, can really impact the Develop module.
This approach by Lightroom keeps file sizes low, lets y'all easily continue rails of edits, and results in higher quality export images. The downside is that it results in a slower system after you've applied a lot of edits to an image as Lightroom has to proceed calculating the edits as you go.
According to Adobe, the best order for editing your photo to maximise performance is as follows:
- Spot healing.
- Geometry corrections, such every bit Lens Correction profiles and Manual corrections, including keystone corrections using the Vertical slider.
- Global non-particular corrections, such equally Exposure and White Balance. These corrections can besides be washed beginning if desired.
- Local corrections, such equally Slope Filter and Adjustment Brush strokes.
- Detail corrections, such as Noise Reduction and Sharpening.
As of recent versions of Lightroom you can reorder the develop modules, and then yous might detect it easier to reorder these into the higher up gild so you always edit in the most performant way.
If you want to do a lot of really detailed edits to a item image, you might find that Adobe Photoshop is a better option.
12. Optimize your Itemize
This one won't change your globe, only certainly, if you lot've non done this for a while (or ever), then yous should definitely optimise your itemize file. Every bit you utilise Lightroom, it is constantly updating the catalog file and over fourth dimension, the structure of the data tin can go less optimal.
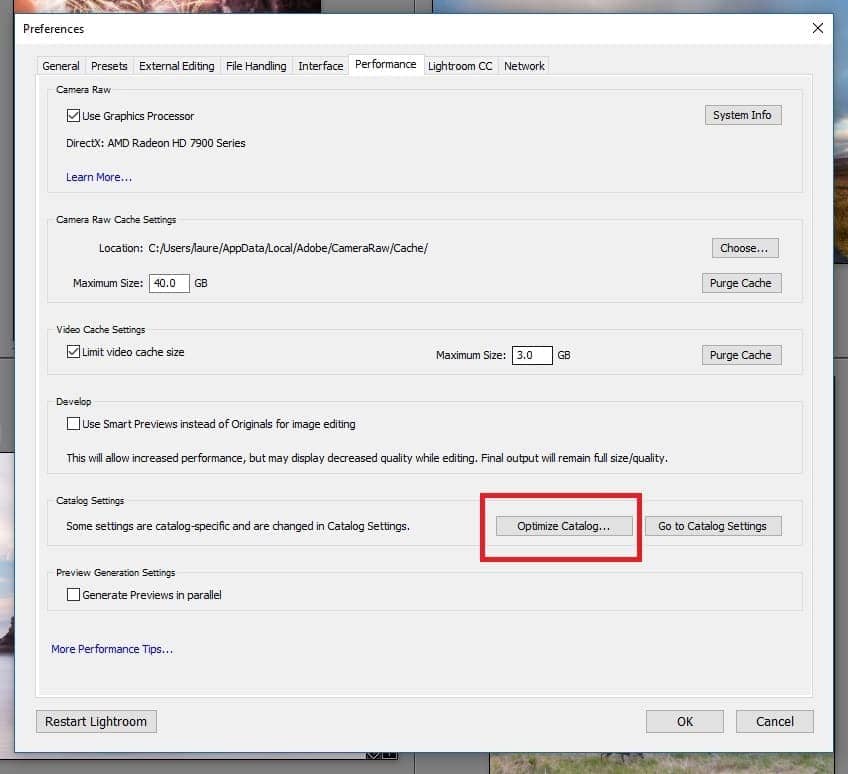
To resolve this, Lightroom has a one-click "optimise itemize" selection, which you can apply to improve performance. My suggestion is to ready upwardly Lightroom to backup your catalog on a regular schedule, such as weekly, and fix information technology to optimise the catalog equally office of the backup.
xiii. Use a Desktop or upgrade your computer for Lightroom Utilize
In an ideal globe, all these functioning tips would magically solve any functioning issues y'all might take with Adobe Lightroom Classic CC. However, there is only so much you can do with the hardware you have. Lightroom is a complicated tool, and needs a relatively loftier specification motorcar to run well.
It may be that your computer isn't up to the job, specially if you're running an older laptop. In which case, an upgrade is likely going to exist on the cards.
If possible, I'd propose investing in a desktop, as these have much greater expansion options, including bays for additional hard drives, besides as higher powered processors and graphics cards. A laptop is of form an choice, just make certain you lot get a relatively loftier specification automobile like this.
Keys specs to look out for are a contempo processor from Intel in the i5 or i7 lineup, at least 16GB of RAM (although you will do good from more than in my feel, up to 64GB will prove benefits), at to the lowest degree i SSD drive, and a dedicated graphics bill of fare from either ATI or nVidia.
For more tips, encounter our total guide to the best laptops for photograph editing.
14. Update Lightroom
Last but not least on my series of tips for optimising Lightroom Classic CC, is to make sure that y'all update Lightroom regularly!
Adobe regularly push out updates to the software, and with their recent focus on performance, it seems likely that futurity updates volition further ameliorate the functioning.
For example, the August 2019 update made some existent improvements to both library navigation and GPU acceleration. The October 2020 update had functioning updates in the develop module for users with GPU acceleration, too as further improvements to the library view. The June 2021 Lightroom update added native back up for Apple'southward new M1 processors, resulting in big operation gains. The Oct 2021 update improved how metadata is read and written, equally well every bit improving batch editing speeds and library preview updates.
Checking for updates is easy, simply press "Help –> Updates", and if there are updates bachelor, Lightroom will prompt you lot to download and install them.
Further Reading
This guide to improving Lightroom performance is only 1 of our photography guides. Hither are some more which we think y'all'll find helpful for improving your photography.
- We have a complete guide to the best photo editing software, besides equally our favourite Lightroom alternatives if yous'd prefer not to use Lightroom, too as a guide to the all-time laptops for photo editing.
- Color accurateness is important for photography – see our guide to monitor calibration to ensure your screen is set up correctly.
- Our guide to picking the best travel camera, which features a range of cameras at various price points. We also have a dedicated guide to picking a compact camera for travel, a guide to picking a mirrorless travel camera, a guide to the best action camera, the best bridge photographic camera, and a guide to picking a DSLR travel camera.
- If yous demand a new lens, we have a guide to the best travel camera lenses which covers the majority of camera types available today
- Our detailed guide to gifts for photographers, if you lot're looking for something to buy for a photographer in your life (or to send to friends and family as a hint!)
- We accept a guide to taking better pictures of yourself, how and why to apply back button focus, how to take pictures of stars, an overview of Neutral Density filters and a guide to shooting in RAW – just some of our photography posts!
- We also accept an always expanding serial of Photography Location Guides, to help you go the all-time shot in locations effectually the world.
- A Beginners' Guide to Improving your Travel Photos for those starting out in travel photography
- Our reasons why you lot demand a travel tripod
Looking to Meliorate Your Photography?
If you found this post helpful, and you lot want to improve your photography overall, you might want to check out my online travel photography course.
Since launching the course in 2016, I've already helped over 2,000+ students learn how to accept better photos. The course covers pretty much everything you lot need to know, from the nuts of how a camera works, through to composition, light, and photo editing.
Information technology likewise covers more advanced topics, including astrophotography, long exposure photography, wink photography and HDR photography.
You get feedback from me as y'all progress, admission to webinars, interviews and videos, likewise as sectional membership of a facebook group where you can get feedback on your work and take role in regular challenges.
It's bachelor for an astonishing one-off price for lifetime admission, and I think yous should check information technology out. Which you can do past clicking hither.
And that's information technology for my postal service on improving Lightroom Classic CC performance for organizing and editing your photos! Do you have whatsoever tips on improving Lightroom performance? Let me know in the comments below!

Source: https://www.findingtheuniverse.com/improve-lightroom-classic-cc-performance/
0 Response to "My Presets Are Gray When Uploading to Lightroom Classic Cc"
Post a Comment